You will have to factory Reset it. Restart your computer and before it starts up press Alt and F10 simultaneously. It will take you to a screen called Acer eRecovery Management ; it will give you an option of resetting. Once reset you can create a new account.
Thursday, May 31, 2012
Wednesday, May 30, 2012
How To Create A System Image In Windows 7
Here's how to prepare for disaster by imaging your hard drive and setting up a data backup system image
1. Click the Start Menu, at the top of the menu Click Getting Started, then on the side Click Back up your Files.
Note: You can also just type Back Up and Windows 7 Search should find the application

2. In the Control Panel window that appears, Click the blue Create a system image link.

3. The Create a system image window should pop-up. Select which hard disk, dvd, or network location you are going to save your system image to. Click Next to continue.

4. On the next page we’ll keep with the basics for now, Check both your System and System Reserved drives. Once you have selected the drives Click Next to continue.
Note: You can select as many drives as you want, but the more you choose to include means the larger the image size will be.

5. The next window is just a review, make sure everything is correct then Click Start backup to start the process. This can take several minutes so patience is required.


6. This is optional : After the backup completes, you’ll be prompted with the option to create a system repair disc. This is a good idea just in case your system has any problems in the future. Click Yes.

7. Choose which Disc Recording drive you’ll be using to burn the disc. Insert a blank CD or DVD to the physical drive and then Click Create disc.

Courtesy: Mr. Austin Krause , Free groovy tech support community.
There is a article on this Blog – How-To Restore from a Windows 7 System Image backup.
1. Click the Start Menu, at the top of the menu Click Getting Started, then on the side Click Back up your Files.
Note: You can also just type Back Up and Windows 7 Search should find the application
2. In the Control Panel window that appears, Click the blue Create a system image link.
3. The Create a system image window should pop-up. Select which hard disk, dvd, or network location you are going to save your system image to. Click Next to continue.
4. On the next page we’ll keep with the basics for now, Check both your System and System Reserved drives. Once you have selected the drives Click Next to continue.
Note: You can select as many drives as you want, but the more you choose to include means the larger the image size will be.
5. The next window is just a review, make sure everything is correct then Click Start backup to start the process. This can take several minutes so patience is required.
6. This is optional : After the backup completes, you’ll be prompted with the option to create a system repair disc. This is a good idea just in case your system has any problems in the future. Click Yes.
7. Choose which Disc Recording drive you’ll be using to burn the disc. Insert a blank CD or DVD to the physical drive and then Click Create disc.
Conclusion
Now you’re covered if your computer crashes,Courtesy: Mr. Austin Krause , Free groovy tech support community.
There is a article on this Blog – How-To Restore from a Windows 7 System Image backup.
How to Recover your System Image in Win7
1. Boot your computer and continually Press the F8 key until you’re brought to the Advanced Boot Options screen. Select Repair your computer and Press Enter.

Windows will take a short amount of time to load up the repair boot.

2. Once the repair boot loads, you’ll need to enter your user name and password. Enter it and Click OK to continue.

3. There are five options available to repair Windows, but in this case we’re going to Click System Image Recovery.

4. When you select a system image to restore from, there are two different options. Usually the Use the latest available system image is the best option. If this option doesn’t appear however, Click select a system image.
5. If you’ve saved your backup on the network you can access it using the Advanced tab. Once you’ve located your backup image, Click Next to continue.

6. Next you’ll be taken to the options screen, under Advanced make sure both of the boxes are checked, and then Press Next.

7. Now the confirmation screen should appear, confirm you are restoring the correct image and then Click Finish.

8. Now all you have to do is wait for the progress bar to fill, and avoid the temptation to click the stop button or reboot the PC.

If everything went like it should, that should be it. Your system should reboot and be restored to exactly the way it was when you created your system image.

Courtesy: Mr. Austin Krause , Free groovy tech support community.
Windows will take a short amount of time to load up the repair boot.
2. Once the repair boot loads, you’ll need to enter your user name and password. Enter it and Click OK to continue.
3. There are five options available to repair Windows, but in this case we’re going to Click System Image Recovery.
4. When you select a system image to restore from, there are two different options. Usually the Use the latest available system image is the best option. If this option doesn’t appear however, Click select a system image.
5. If you’ve saved your backup on the network you can access it using the Advanced tab. Once you’ve located your backup image, Click Next to continue.
6. Next you’ll be taken to the options screen, under Advanced make sure both of the boxes are checked, and then Press Next.
7. Now the confirmation screen should appear, confirm you are restoring the correct image and then Click Finish.
8. Now all you have to do is wait for the progress bar to fill, and avoid the temptation to click the stop button or reboot the PC.
If everything went like it should, that should be it. Your system should reboot and be restored to exactly the way it was when you created your system image.
Courtesy: Mr. Austin Krause , Free groovy tech support community.
Windows 7: Pause the Blue Screen Of Death (BSOD)
The Blue Screen Of Death (BSOD) is the nightmare of every Windows user. When it appears, many users may want to write down the error code to troubleshoot the problem. Unfortunately, the system will be restarted automatically in most cases, so you may have no idea what the error code is. Here is how to pause the screen when your computer has BSOD to make troubleshooting your system easier. This method works with other system failures as well.
1. Right click on Computer -> Properties.

2. In the System window, go to Advanced system settings.

3. When the System Properties window pops up, switch to Advanced tab -> Settings (under Startup and Recovery)

4. Uncheck Automatically restart (under System failure) and hit OK.
1. Right click on Computer -> Properties.

2. In the System window, go to Advanced system settings.
3. When the System Properties window pops up, switch to Advanced tab -> Settings (under Startup and Recovery)
4. Uncheck Automatically restart (under System failure) and hit OK.
Simple timer programs for your PC
I understand all about becoming so wrapped up in the computer that
everything else goes out the window. Fortunately, there are several
timer programs available to help. Orzeszek Timer and CookTimer
are both easy-to-use countdown timers. Just set a length of time and
you'll hear an alarm when the timer reaches zero.

Tuesday, May 29, 2012
How to permanently delete your PC data
Your first thought may be that when you 'delete' the file, the data is gone. Not quite, when you delete a file, the operating system does not really remove the file from the disk; it only removes the reference of the file from the file system table. The file remains on the disk until another file is created over it, and even after that, it might be possible to recover data by studying the magnetic fields on the disk platter surface.Before the file is overwritten, anyone can easily retrieve it with a disk maintenance or an undelete utility.
I recommend using the free program Eraser to permanently delete your data. Eraser writes over files with meaningless data, making the files unrecoverable. The program offers many options for deleting files.
Why Use Eraser?
There are several problems in secure file removal, mostly caused by the use of write cache, construction of the hard disk and the use of data encoding. These problems have been taken into consideration when Eraser was designed, and because of this intuitive design and a simple user interface, you can safely and easily erase private data from your hard drive.
A safe way to remove viruses from a computer without the risk of getting infected
Written by Elena Opris
Kaspersky products have already built a name amongst the most powerful security systems that remove viruses, spyware, worms, and other malicious activity from your system.
Kaspersky Rescue Disk is such a product, with a twist. You can burn the image to a CD, and set it to boot from the CD when using it on an infected CD-ROM drive.
This tool is very simple to use, and it has a standard and visually-appealing interface.
You simply select the objects Kaspersky has to scan (disk boot sectors, hidden startup objects, or local hard drives), and hit the scan button.
The Rescue Disk will make a report of all malicious objects found in your system, like viruses and Trojans, but also adware and other similar software.
Any found infected files can be quarantined, disinfected, or removed.
In the Settings menu you can configure the current security level, file types, scan optimization (i.e. skip files scanned longer than a given number of seconds), archive scanning, installation packages, and others.
Updates are done on a regular basis, and notifications can be set for malware detection or modifications, obsolete databases, failed tasks, or others.
Our tests enabled the Rescue Disk to discover and remove a few spyware from our systems, but of course it took its time for a full scan.
CPU and memory are fairly used when Kaspersky Rescue Disk is active.
So, if you want an effective way to cleanup the mess left by viruses and malware, use Kaspersky Rescue Disk. It's free! You can download it from the link given below:
http://www.softpedia.com/get/Antivirus/Kaspersky-Rescue-Disk.shtml
Monday, May 28, 2012
How to Enable Streaming in µTorrent 3.0:
The new version of the popular Bit Torrent client allows you to watch videos with progressive downloads which means you can preview a file before waiting for it to fully download. You need to enable the feature and set the video player to be used.
1. Open µTorrent.
2. Go to the menu. Click Options and select Preferences.

3. In the left pane, click Streaming.

4. In the right pane, check the Use default player checkbox to use your system’s default video player.

If you wish to use a different video player, use the dropdown to select the desired application

and the command to launch the player will populate the blank dropdown.

5. Use the slider controls to set the Streaming peertimeout and buffer size values.

6. Click the OK button.
1. Open µTorrent.
2. Go to the menu. Click Options and select Preferences.
3. In the left pane, click Streaming.
4. In the right pane, check the Use default player checkbox to use your system’s default video player.
If you wish to use a different video player, use the dropdown to select the desired application
and the command to launch the player will populate the blank dropdown.
5. Use the slider controls to set the Streaming peertimeout and buffer size values.
6. Click the OK button.
Saturday, May 26, 2012
How to export PDF to Word and edit
Why export PDF to Word?Though PDF files have become one of the most popular file format
world-widely, it's really a big headache to edit PDF. PDF's security
properties disallow copying and editing, even printing, so, people find
another alternative - export PDF to Word.
How to export PDF to Word?
It's not hard to export PDF to Word and edit if you find a right method. Below introduce 4 more efficient ways for reference, you can choose one suitable.
1. Adobe Acrobat X Pro
Refer to editing PDF, people always think about Adobe Acrobat first. Yes, with Adobe Acrobat X Pro, you can easily edit PDF files and export PDFs to Word documents.
Open the PDF file > click File and choose Export > choose Word Document.

Minus: it costs too much, $199 at least for pro version.
2. Google Documents
Google Documents is a free application developed by Google. It's not only an excellent alternative to Microsoft Office, but also a good PDF converter. The most important, it's totally free to use with a free Google Account.
It's easy to export PDF to Word. Log into Google Account > upload your PDF file > click File in the Menu bar and choose Download as > choose Word as the output file format. Besides, Google Docs also supports other formats like .ODT, .RTF, Text and HTML (Zipped), etc.
What's more, you can even make scanned PDF editable with Google Docs.

Minus: It requires a Google Account and you need to connect with the Internet, otherwise, you can't export PDF to Word with Google Docs.
3. Zamzar is another free PDF to Doc converter. Actually, it will be more accurate to call ZamZar a PDF converter, as it can not only convert PDF to Doc, but also convert PDF to other formats like PDF to xlsx, PDF to PPT, etc. However, it only converts one PDF file at a time and takes a long time to wait for the converted Word file, as ZamZar will send it to your email you have entered.
Note: ZamZar requires an email address to receive the converted document.
4.Free PDF to Word Doc Converter is a desktop document conversion tool to convert Adobe PDF to MS Word file. The program can extract text, images, and shapes from PDF file to DOC file and preserve the layout. It can convert all the pages, or any part of the PDF file. It is a standalone program, so you can convert PDF to Word Doc without Adobe Acrobat Reader or Microsoft Word installed. This version is the first release on CNET Download.com. To download click on the link given below.
Download Free-PDF-To-Word-Doc-Convertor
How to export PDF to Word?
It's not hard to export PDF to Word and edit if you find a right method. Below introduce 4 more efficient ways for reference, you can choose one suitable.
1. Adobe Acrobat X Pro
Refer to editing PDF, people always think about Adobe Acrobat first. Yes, with Adobe Acrobat X Pro, you can easily edit PDF files and export PDFs to Word documents.
Open the PDF file > click File and choose Export > choose Word Document.
Minus: it costs too much, $199 at least for pro version.
2. Google Documents
Google Documents is a free application developed by Google. It's not only an excellent alternative to Microsoft Office, but also a good PDF converter. The most important, it's totally free to use with a free Google Account.
It's easy to export PDF to Word. Log into Google Account > upload your PDF file > click File in the Menu bar and choose Download as > choose Word as the output file format. Besides, Google Docs also supports other formats like .ODT, .RTF, Text and HTML (Zipped), etc.
What's more, you can even make scanned PDF editable with Google Docs.
Minus: It requires a Google Account and you need to connect with the Internet, otherwise, you can't export PDF to Word with Google Docs.
3. Zamzar is another free PDF to Doc converter. Actually, it will be more accurate to call ZamZar a PDF converter, as it can not only convert PDF to Doc, but also convert PDF to other formats like PDF to xlsx, PDF to PPT, etc. However, it only converts one PDF file at a time and takes a long time to wait for the converted Word file, as ZamZar will send it to your email you have entered.
Note: ZamZar requires an email address to receive the converted document.
4.Free PDF to Word Doc Converter is a desktop document conversion tool to convert Adobe PDF to MS Word file. The program can extract text, images, and shapes from PDF file to DOC file and preserve the layout. It can convert all the pages, or any part of the PDF file. It is a standalone program, so you can convert PDF to Word Doc without Adobe Acrobat Reader or Microsoft Word installed. This version is the first release on CNET Download.com. To download click on the link given below.
Download Free-PDF-To-Word-Doc-Convertor
Friday, May 25, 2012
How to save your Office files to PDF format free?
Office Word, Excel, PowerPoint are the three
most important Office tools within Microsoft Office Suit in people's
daily life and work.
However, Office files are not suitable for sharing. The formatting
and layouts may lose when sending them to others. So, people always
choose PDF format for exchanging and sharing. Now, the problem is: How to save your Office files to PDF format?
Actually, there are several ways for choice; you can choose one that suitable for you.
To save office 2010 to PDF, go to Share -> Create PDF Document as below.


Above two ways are useful when you are using Office 2007 or latter, but how about the users which are used to the typical Office 2003 or before version? Don't worry, there are many other ways to allow you to convert Office to PDF.

All three ways mentioned above are free and they can meet your need to convert Office to PDF most of time.
Actually, there are several ways for choice; you can choose one that suitable for you.
1. Directly Save Office to PDF (Office 2010)
Office 2010 includes a built-in Office to PDF converter to help you save your Office files to PDF format by clicking of a button. So, if you are using Office 2010, you can directly save Excel as PDF, save PowerPoint as PDF, save Word as PDF without any assistant program.To save office 2010 to PDF, go to Share -> Create PDF Document as below.
2. Save as PDF Add-in (Office 2007)
Microsoft Add-in: It is a "Save as PDF/XPS" add-in developed by Microsoft that allows you to save Office to PDF. It is applicable for Office 2007 or later version. So, if you are using Microsoft Office 2007 or latter, you can download and install the Add-in, then, you can save your office files to PDF format easily.Above two ways are useful when you are using Office 2007 or latter, but how about the users which are used to the typical Office 2003 or before version? Don't worry, there are many other ways to allow you to convert Office to PDF.
3. PDF Creator Lite
PDF Creator Lite is a free PDF creator designed to create PDF form most printable files. It works as a virtual PDF printer, so, you can use it not only to convert Office to PDF, but also print Images to PDF, like JPG to PDF, etc.All three ways mentioned above are free and they can meet your need to convert Office to PDF most of time.
How to Capture a Still Image From a Video using VLC player
1. Open VLC media player. It's free software; if you don't already have it, download it here:
Download VLC media player

2. Pause your video to the point for which you need to capture image.

3. On Video menu click Snapshot (Menu bar –> Video –> Snapshot)
4. Your image is saved.
5. You can access your image from default store location.
6. To change default storage location go to Menu –> Tools –> Preference
7. Under Preference –> Video –> Video Snapshot section. Change your location.
Click to pull up the General Video Settings
Download VLC media player
2. Pause your video to the point for which you need to capture image.

3. On Video menu click Snapshot (Menu bar –> Video –> Snapshot)
4. Your image is saved.
5. You can access your image from default store location.
6. To change default storage location go to Menu –> Tools –> Preference
7. Under Preference –> Video –> Video Snapshot section. Change your location.
Click to pull up the General Video Settings
Thursday, May 24, 2012
Free file recovery software for home users
MiniTool Power Data Recovery Free Edition
MiniTool Power Data Recovery is an easy-to-use and all in one free file recovery software for home users. With this most effective free file recovery tool, you do not need to have technical background to use it. All the data recovery steps are logical and easy like 1-2-3. Just follow the data recovery step, and you will get your lost data back. Unlike other free file recovery software. MiniTool Power Data Recovery is very powerful and professional. It not only helps you recover deleted files, but also recovers data from damaged, reformatted hard drive as well. Furthermore, MiniTool Power Data Recovery not only recovers data from hard disk and RAID device, but also supports to recover data from CD, DVD disks, memory card, memory stick, and flash drive. As a data recovery software suite, MiniTool Power Data Recovery includes five data recovery modules - Undelete Recovery, Damaged Partition Recovery, Lost Partition Recovery, Digital Media Recovery and CD/DVD Recovery. Each data recovery module focuses on different data loss condition.What's new in this version: Enhanced scan & recovery data engine with automatic error correction.

Mini Tool Power Data Recovery Free Edition
What Does Cloud Computing Mean?
Cloud computing. For some, the term is wildly nebulous.
For decades, engineers have drawn a cloud to depict a
network (such as the Internet) whose inner workings were unknown to them. From
there, cloud computing evolved as a term to describe free or
subscription-based services delivered in real time over the Internet.
Cloud computing can refer to software as a service, such as
for customer relationship management (CRM); to file storage, synchronization,
backup, and other utility over
the Internet.
Examples of Cloud Computing Services for Small Business
Among the most popular and easy explainable services were these:
• Google Apps ($50 per user per year) Google Docs (free) are offerings from the Google cloud empire. Google Apps is a business-class version of Google Docs and includes souped-up Gmail, Google Calendar, and Google Docs (for word processing, spreadsheet, presentations and forms) components along with administration capabilities.
With either Google Apps or Google Docs, your data remains in one place no matter where you access it from. Google’s cloud tools are “actually more secure on the whole because, although you’re trusting your data to an external provider, Google works hard to secure a ton of data; and it's the sort of attention to detail that you probably don't have time or money for in your local IT department.”
• Skype
is popular for its free video chats as well as for the low-cost calls
to landline and cell phones that it makes possible. Brand Thunder, a browser
customization firm with 11 members, uses Skype for all-team meetings. Though Skype call quality varies,
the service “allows easy and open communication between team members, despite
their being geographically dispersed.
The Benefits of Cloud Computing
Cloud-based services can help small businesses dramatically reduce their
software and other computing costs.
Google Docs, which offers office
productivity tools (MS Office 2010 products) via the cloud, is free. (Microsoft is currently working on Web-based versions of Office 2010 apps.)
Storing files on a secure, reliable, cloud-based service helps eliminate
backup worries and gives you anytime access to your files. Usually, cloud-based
services are simple to use—the only things you need are a computer (or in some
cases, a mobile handset), a browser, and an Internet connection. And such
services require no maintenance from the user.
Easier collaboration with colleagues in distant locations is another
oft-cited cloud benefit.
“If you're the kind of small business that has employees who work from
different places--or has remote employees, board members, or vendors who need
access to your data--cloud computing is the only way to go.
These benefits enable small businesses to “stay focused, be more
collaborative, and bring products to market more quickly, because they’ve got
access to the kind of infrastructure.
The Cloud’s Dark Side
The biggest misgiving that most businesses have about
the cloud involves security , privacy and availability
.
• Privacy: How much data are cloud companies like Google collecting about you , and how might that information be used?
• Availability: Will your cloud service go down
unexpectedly, leaving you without access to critical customer records, e-mail,
or other information for hours or more? Well-established services have gone dark on occasion, too.
• Data loss: Some online storage sites have shut down abruptly, sending users scrambling to recover
their data, sometimes with only 24 hours' notice.
• Data mobility and ownership: Will you be able to share
data between different cloud services? If you decide to stop using a cloud
service, can you get all of your data back? What format will it be in? How can
you be certain that the cloud service will destroy all of your data once you’ve
severed ties with it?
• Tool robustness: Cloud-based tools frequently aren't as
powerful as software applications. Google Docs, for instance, lacks a number of
features that Microsoft Office has had for years, such as the ability to track
changes in a text file.
Tips for Moving Into the Cloud
Once you’ve weighed the pros and cons, you may be ready to take your first
steps into cloud computing. Before you do, consider these tips from small
businesses that have already made the transition.
• Start small. Cloud computing is a different way of working
from what most people are used to, and building familiarity and trust takes
time, says Trevor Doerksen, CEO and founder of Mobo Vivo, a software company. Doerksen recommends starting small--for
example, by having two or more workers collaborate on a Google Docs file. Once
team members grow more comfortable with the new work environment, you can start
adding more cloud services to the mix.
• Think big. Can the service you’re considering scale to
meet your needs as your business grows? If not, keep looking.
• Make sure you can export your data in standard formats.
You'll want to be able to export in the formats used by Word, Excel, and other
programs you use. That way, you can back up (and access) your data locally or
move it easily to another service later.
• Read the agreement closely. To use the service, you’ll
most likely have to accept an endless service-level agreement or other contract
at the outset. Read it carefully to ensure that you know what you’re paying for,
what the service provider’s privacy policy is, whether there are fees for early
termination, and so on.
• Get creative. Look for ways to use free or low-cost cloud
tools instead of more-expensive ones, suggests Doerksen. For example, his team
uses free Google Docs spreadsheets as a basic CRM system, rather than springing
for a paid CRM cloud service.
• Evaluate more than one service before deciding. Most
services offer a free trial, and “you can usually figure out in 10 minutes
whether the service’s user interface will drive you mad or is easy to use,” says
Rosenfeld.
• Consider open-source cloud services. This arrangement
encourages third-party developers to build add-ons that make a cloud-based
service even more feature-rich. Plus, it allows you to create your own tools for
using the service that are unique to your business.
• Don’t be afraid. It makes sense to cautiously approach any
big change in how you do business, and this certainly applies to moving to the
cloud. But many feel that the business world is already making the transition to
cloud computing, and--given the lousy economy--now is a good time to make the
transition.
Courtesy: By James A. Martin , PCWorld
James A. Martin
is a PCWorld contributing editor and a coauthor of Getting Organized in the Google Era (Broadway Books).
Wednesday, May 23, 2012
Freeware Image Editor That's Incredibly Fast
There are lots of freeware image editors around, but some of them are slow or bloated. Phoxo is neither slow or bloated, the download is only around 4 MB, and once you've installed the software it's incredibly fast to load too. But it's not short of features either, as you can see from the toolbars and icons shown below.

You can download Phoxo from www.phoxo.com/en. It runs on Windows XP and above.
How to Turn off the Touch Pad
At time you find that your touchpad creating problem and you run into a situations where it may not be a bad to disable the touchpad at least during the time when you are using a mouse or are typing a long document.
Some laptops don’t have dedicated buttons but you can use Function keys (like Fn + F5 on Dell computers) to toggle the state of your touch pad. In the case of HP laptops, you can hold the top-left corner of the touchpad for few seconds and it will disable the touch pad – repeat this to re-activate it.
New laptop computers either have a physical on/off button to easily disable the touch pad or there’s an icon in the system tray that lets you manage the various settings of the touchpad.
If you don't have that icon, you can go to Control Panel –> Mouse Properties –> Touch Pad to enable or disable the touchpad.
The touch pad can also be disabled through the device manager. Type devmgmt.msc in the Windows Run box to start the device manager, expand “Mice and other Pointing devices”, right-click and disable the driver entry that says Touch pad or likewise.
If none of the above solutions work for your brand of laptop, try TouchPad Pal try it’s a free Windows utility that will temporarily disable the touchpad of your laptop as you go into typing mode. The utility runs in the system tray and requires no configuration.
Finally, if you would like to get rid of the touchpad completely, you can consider disabling it through the BIOS itself. The exact path that you need to follow to reach the Pointing Devices section in your BIOS may however vary for different laptops.
Monday, May 21, 2012
Things to Consider When Buying A Laptop
1) Primary Functionality
A favorite mantra of mine to any who are considering which laptop to purchase is asking yourself: What are you planning to use the computer for? The answer to this question in many ways dictates the direction to focus your computer buying attention. Are you planning on gaming or just tooling around the Internet? Is it for the kids' homework, or is it something that needs a bit more power to do some video editing? A computer bought for the kids' homework may only need a low end (basic) processor, while something for gaming would call for a far more powerful processor.
2) Who Made What?
Most of the laptops sold today are actually made by a handful of Taiwanese companies. The top five companies (Quanta, Compal, Wistron, Inventec, and Asus) actually manufacturer over 85% of all laptops sold worldwide. All the top tier computer “manufacturers” (for example: Acer, Apple, Dell, HP/Compaq, Gateway, Fujitsu, Lenovo, Sony, Toshiba, etc.) generally are not really “manufacturing” laptops but rather contracting one or more of these companies to manufacturer their laptops for them.
3) Faster, Higher, Stronger
3) Faster, Higher, Stronger
With the delicate balance of performance and pocketbook to keep in mind, the three BIG things that will determine your laptops performance out of the gate will be: processor, memory, and video. Other things will affect it as well, but these seem to be the “big three.”
• Processors
The CPU and you
When it comes to processors, a general rule of thumb is to buy the fastest that you can afford. There's also the question of how many cores you should get. Entry level these days is dual core, which will suit most people just fine. There are also triple-core and quad-core processors out there, but keep in mind that not all applications take advantage of this extra power. Some video-encoding applications, 3D applications and games will use them or a gamer. It'll likely be worth investing in a dual core ,if you mainly just browse the internet.You have a lot of options, so below are the basics.
High performance
Intel Core i7
Now in its second generation (and about to enter its third), Intel holds the fastest chips in the mobile space. As the performance part, Core i7 is often paired with a discrete graphics processing unit (GPU).
AMD's strategy in the CPU world seems to be changing; it no longer competes at the high end.
Mainstream performance
Core i5
Available in dual- and quad-core configurations, as well as low-voltage variants, the Core i5 is the workhorse of the industry, filling many a fine mainstream laptop. Just make sure that you pick up a second-generation part, easily identifiable by the model number starting with a two. It'll usually come with Intel HD graphics, although it's often paired with a discrete graphics card from AMD or Nvidia, as well.
AMD A8
A quad-core part, the A8's performance falls somewhere between Intel's dual-core Core i3 and Core i5, depending on the clock speed.
Budget
Core i3
Now in its second generation, these dual-core processors are almost exclusively paired with Intel HD Graphics, and are for those who only do the basics: word processing, image viewing, music listening and internet browsing. It's a small step above the processors below, and is usually what we consider as being the minimum for hassle-free computing.
Intel Pentium and Celeron; AMD A6, A4
These are low-performance machines that tend to be used in sub-AU$700, 14-inch to 15.6-inch laptops, primarily to keep the cost down. If you're on a strict budget and have modest needs, then these may do the job for you.
Low power, low performance
Intel Atom, AMD C series, AMD E series
These tend to be used in the 8.9- to 11.6-inch space, in laptops often incorrectly termed "netbooks" — a phrase that is actually reserved for laptops featuring Intel's Atom CPU.
These are generally low-power, very low-performance chips best suited to basic internet browsing and office tasks.
While Atom really hasn't progressed much in the performance stakes in the past year, AMD's competing E series does provide a much better computing experience at the budget end.
Having enough memory is vital to system performance, and lots of RAM lets you run more applications simultaneously. Sufficient RAM is also necessary for graphics work, image editing and video editing, and is crucial for 3D gaming. This is especially true in notebooks, because notebook graphics processors frequently have little or no memory of their own, and share the main system's RAM.• Memory
Here's an easy way to determine how much you need:
512MB: generally fine if you're running a Linux variant on something small like a netbook, but really, this is far too little for today's uses.
1GB: adequate for running a number of basic programs at once, but you may find that your machine struggles quite a bit with modern apps and operating systems.
2GB: entry level. This will be fine for office work and basic internet browsing, and will get you by for most basic tasks.
4GB or more: recommended! Good for 3D gaming, graphics work and video editing. Keep in mind that if you hit the 4GB point, you'll need to run a 64-bit operating system to take advantage of all the memory — a 32-bit one won't be able to access it all. Make sure to check that you're getting a 64-bit version of Windows before you buy.
• Video
With the introduction of Intel HD Graphics on Core i3 processors and above, the bar has now been raised enough for integrated graphics to suit most peoples' needs. If you want to play games, though, you'll need a dedicated GPU — try to grab something with 512MB to 1GB of video RAM. Larger video memory does tend to be paired with higher performing cards, it's not the thing that's primarily responsible for the performance increase.
Few other pointers on what you'll need to consider before buying a laptop.
1. Weight
Notebooks divided into five categories by weight, with some overlap: netbooks (usually less than 1kg), ultraportables (1.5kg-2kg), thin and lights , mainstream models (2kg-4kg) .
2. The great outdoors
Sunlight is not ideal for computing — specifically, for seeing the screen. If you want to work outdoors, you'll need to hunt for a matte screen. While some have matte, most come with glossy screens, maximizing reflections and making it hard to see anything when outside.
As a general rule of thumb, most business laptops still come with matte screens, and some laptops, like the MacBook Pro 15, have matte options if you're willing to pay a little more.
3. Finger fitting
As notebooks shrink in size, so do their keyboards. If possible, try some simple typing exercises before you buy it. Pay particular attention to the space bar, Shift, Ctrl and Backspace/Delete keys. Be sure that all are in good locations for your hand size and typing style.Keep an eye out for backlit keyboards, as well — these help immensely when typing in dim light.
4. Touchy, touchy
Computing today relies a lot on mousing. Test the notebook's input device for comfort and responsiveness. Some touch pads include extra features, such as a dedicated area for scrolling, or multi-touch capability.5. Get connected
Make sure that you have enough ports on your laptop — at a minimum, look for two USB ports (although three to four is better). If you'd like to use a digital camcorder with your notebook, you may need a FireWire (IEEE 1394) port. Connecting a monitor will require a VGA port at minimum (if you'll be giving presentations, a VGA port is also where you'll connect a projector), but for extra image quality look for a DVI, HDMI or DisplayPort connector in addition to this. A lot of PC laptops these days also have a combined USB and eSATA port — eSATA allows faster connections to external hard drives, provided that your external hard drive supports it.These days, there are two newer ports doing the rounds — USB 3.0 (often indicated by a blue USB port or an "SS" symbol above the port) and Thunderbolt. USB 3.0 can offer significantly better speeds than USB 2.0 (up to 254MBps in our tests so far), providing that what you're plugging in is capable of those speeds.
6. Go wireless
Integrated wireless networking (Wi-Fi) has become an indispensable feature. Most notebooks ship with a variant of 802.11n these days, although some (such as netbooks) still use 802.11g. Public hotspots typically use 802.11g; fortunately, 802.11n is backwards compatible, along with 802.11b.Most mainstream laptops come with 2.4GHz 802.11n, whereas the premium ones come with both 2.4GHz and 5GHz. The difference: 2.4GHz has greater range, but lesser throughput. It also has more chance of interference, either from your neighbour's Wi-Fi or from other implements that use the 2.4GHz spectrum, like microwaves and cordless phones.
5GHz has less chance of interference and higher throughput, but has smaller range. Your wireless router will also need to support it for you to take advantage of it.
7. Power without the plug
While you might have a two- or three-year warranty on your laptop, your battery is generally only covered for one year.Two specs to look for in laptop batteries are capacity (measured in milliamp hours, or mAh) and the number of cells. Typical batteries have an mAh rating of between 2000mAh and 6000mAh; higher is better. Cells are the actual compartments where power is produced, and can range from four to 12; the more the better.
Some laptops don't have easily swappable batteries, in an attempt to cut down on physical size and to lengthen battery life. Be aware of this — and when your battery dies, you may need to take your laptop in for a service rather than simply swapping the battery out yourself.
On the other hand, some can take a second battery, either by replacing the optical drive or by placing a shim on the bottom. Check your accessories before you buy.
8. Tiny, tinny sound
Laptops are notorious for having terrible speakers. While a lot of laptops these days are including some version of Dolby, THX, Beats or other sort of "branded" sound, this is done in software, and often paired with such tiny speakers that it doesn't make that much of a difference.You can even get speakers powered by USB if you want something portable that doesn't require a power point.
9. Going for the perfect drive
Notebook hard drives tend to start at the 320 GB point, and work their way up to 1TB in size. If you have a choice, select a drive with a rotational speed of 7200rpm instead of 5400rpm. The faster it spins, the faster you'll get your files.Solid state drives (SSDs) are also an option, bringing significantly faster sequential and random read and write speeds, and a much higher cost as a result.
We like DVD±RW drives for notebooks; they burn and play both DVDs and CDs. Blu-ray is a good choice if you're a movie buff, but make sure that your notebook can display a Full HD resolution (at least 1920x1080, usually only seen on desktop replacements), or can at least output the video to a screen that can — otherwise, you'll lose the benefits of all of that clarity.
10. When good notebooks go bad
Every notebook is susceptible to accidents and system failures. Keep an eye open for longer than usual warranties, and check to see if the manufacturer offers an international warranty rather than local — particularly useful for travellers.We recommend, if available, paying for a good three-year warranty with express service. Try getting it direct from the manufacturer rather than dealing with in-store warranty extensions.
11. Essential accessories
These include a laptop bag, an extra battery, a mouse, keyboard, software for office work, internet security and system maintenance. You may even want to consider an external hard drive for backup.12. What's it made of?
Most laptop cases are still made from moulded plastic, but you can find some encased in metal, which dissipates heat better. Look for models made from light, strong metal alloys. Check that the case has adequate ventilation for the powerful and hot-running components inside.13. 32- or 64-bit?
Most vendors should be selling laptops today with Windows 7 64-bit, with only business laptops being the exception for compatibility reasons. If the choice is presented to you, you'll want a 64-bit version of Windows, as the 32-bit version can't address 4GB RAM or greater.14. Are you an Apple person?
Perhaps you've been curious about Apple' MacBooks — just be aware that if you were previously a Windows user, you'll need all new software to go with that Mac purchase, and the transition might be a little daunting.Also be aware that Apple's extended warranty option, called Apple Care, can be quite expensive. We recommend you do purchase Apple Care so you're covered for a longer period of time — just be prepared for the price hike.
Sunday, May 20, 2012
There is no display while connecting laptop to a HDTV or PROJECTOR
I try to connect my laptop to a HDTV either through HDMI and VGA but it doesn't work. There is no signal on my TV.
I've tried to look for the option called "connect to a projector" from "display" in control panel but there is no such option in display.
I've tried to look for the option called "connect to a projector" from "display" in control panel but there is no such option in display.
How to Connect your Laptop to a Television Screen
This tutorial describes how you can connect your laptop or notebook computer to your television screen using standard ports like S-Video, VGA or DVI
If you want to watch YouTube videos and Flickr photos on his large TV screen with the entire family and is wondering if there’s an easy way to connect a laptop to the TV.
If you want to watch YouTube videos and Flickr photos on his large TV screen with the entire family and is wondering if there’s an easy way to connect a laptop to the TV.
Well there are several ways to connect your computer to a Television depending on what ports are available on your PC and your TV.
How to Connect Laptop to TV
There are five ways you can connect your laptop to a TV.
1. S-Video – This is probably the most common method as S-Video is there in every TV . You’ll have to make sure you laptop is equipped with this port. Remember, there are two types of S-Video cables: 4-pin and 7-pin. Most laptops and PC’s are equipped with a 7-pin port, so if your TV only has a 4-pin S-Video port, then this method will not work.
2. VGA – If you have a HDTV, then you will be better off connecting using a vga cable. You usually won’t find a VGA input on regular TV’s , this option is if you have an HDTV.
3. DVI - DVI stands for Digital Visual Interface with “digital” being the key word there. The digital signal will give a higher quality picture than either S-Video or VGA. Of course, your computer will need to have a DVI connection and your TV will need to be an HDTV. This cord is definitely not cheap, it ranges anywhere from Rs. 300 to Rs. 400.
4. HDMI – Using HDMI will give you the best quality by far. Now computers have HDMI ports, but if you don't have a HDMI port than get a DVI to HDMI cable to connect it to your HDTV. HDMI is compatible with DVI.
5. Scan Convertor Box – This is the last method that I could think of and it involves using a scan converter box, which takes a VGA signal and converts it into S-Video or component video.
Here’s a pictures of the various cables:
http://www.youtube.com/watch?v=apkOG4iG-YQ&feature=related

How to Connect Laptop to TV
There are five ways you can connect your laptop to a TV.
1. S-Video – This is probably the most common method as S-Video is there in every TV . You’ll have to make sure you laptop is equipped with this port. Remember, there are two types of S-Video cables: 4-pin and 7-pin. Most laptops and PC’s are equipped with a 7-pin port, so if your TV only has a 4-pin S-Video port, then this method will not work.
2. VGA – If you have a HDTV, then you will be better off connecting using a vga cable. You usually won’t find a VGA input on regular TV’s , this option is if you have an HDTV.
3. DVI - DVI stands for Digital Visual Interface with “digital” being the key word there. The digital signal will give a higher quality picture than either S-Video or VGA. Of course, your computer will need to have a DVI connection and your TV will need to be an HDTV. This cord is definitely not cheap, it ranges anywhere from Rs. 300 to Rs. 400.
4. HDMI – Using HDMI will give you the best quality by far. Now computers have HDMI ports, but if you don't have a HDMI port than get a DVI to HDMI cable to connect it to your HDTV. HDMI is compatible with DVI.
5. Scan Convertor Box – This is the last method that I could think of and it involves using a scan converter box, which takes a VGA signal and converts it into S-Video or component video.
Here’s a pictures of the various cables:

Method:
You can watch this video on youtube to know about the connection :http://www.youtube.com/watch?v=apkOG4iG-YQ&feature=related
Connect the Audio RCA Cable for Sound to transmit the sound as all the above cables only transmit the video but not the audio part.
Mini to RCA Audio Cable
Saturday, May 19, 2012
Free OCR Software to Extract Text from Images
Sometimes
we need to get the text out of photos or scanned documents. There you
can use OCR (Optical Character Recognition) software which are available
for free to download to extract the text from images or photos taken
from digital cameras or Smartphones. There are lot many small software
available for this purpose.

Here are some popular OCR software available for free.
Download SimpleOCR
Windows OS users can also install Microsoft Office OneNote and use “Copy text from picture” option to get text out of images. You just need to open a scanned document or picture in one note and right click on the image to get the option to copy text.
Mac OS users are having very limited options in freely available OCR software. Some of the popular OCR software for Mac are ABBYY FineReader and OmniPage Pro X.

Here are some popular OCR software available for free.
1. FreeOCR.net
This free OCR software is available to download on Softpedia. Size of the software is 156 KB. You can install this software on Windows XP, Vista or Windows 7 operating systems. Go ahead and install this software to extract text from images, scanned documents. Use this OCR software on pictures taken from 3 Mega Pixel or better resolution camera. This software requires Microsoft .net installation.Download FreeOCR2. SimpleOCR
It is a free to download OCR software available on web. If you are having a scanner or All in one printer, then you can just scan a copy and use SimpleOCR to extract text out of the scanned document. Then just print the text only. SimpleOCr is a freeware and expected to remain available for free in future as well.Download SimpleOCR
Windows OS users can also install Microsoft Office OneNote and use “Copy text from picture” option to get text out of images. You just need to open a scanned document or picture in one note and right click on the image to get the option to copy text.
Mac OS users are having very limited options in freely available OCR software. Some of the popular OCR software for Mac are ABBYY FineReader and OmniPage Pro X.
Friday, May 18, 2012
Free Tool to convert normal Pictures into Painting Sketch in no time
Not everyone is a Photoshop expert ((including me) but we all want to have some level of style in our regular pictures taken from Digital Camera. Here is a free tool to convert a normal picture into a painting sketch , pencil drawn sketch and much more. In case you want to impress your friends with new avatar , you may add this kind of effect to have a cool looking picture without putting much effort .


I am talking about FotoSketcher which is available for Windows PC and it is available to download for free. Install the same on your computer and start using it. Go ahead and upload the picture in that tool to have a nice looking sketch of the same. Here is what I got after running this tool on one of my picture.
Normal picture taken from Digital Camera
Normal picture taken from Digital Camera

Converted to painting sketch (pencil effect) by using FotoSketcher

There are so many effects available in the tool to use by selecting them from dropdown. Once you finalize the settings, you may download the changed picture and use that for any purpose.
Note: During installation uncheck the two option of fotosketcher toolbar and Ask.com home page otherwise the will creep inside your browser.
Thursday, May 17, 2012
Use Google Search box as a Calculator
We know WolframAlpha is much powerful search box to do calculations but we open google more than any other search box. For simple calculations, we can use Google Search box or type the mathematical calculation on Google Chrome address bar to get results. To do that, you need to type the query in special format to get proper result on Search result page. Here are some examples to get mathematical calculation results on Google Search Result page. This way you can use Google as a calculator as well.
Now Google will format this query by arranging the multiplication and division operators in small brackets for correct calculation. Here is the SERP of Google for this query:

Similarly you can type 88% of 2000
It will find the correct amount corresponding to the 88 percentage of 2,000. Here is the SERP for this query,

Convert Units and Currency: type 1000 USD in INR

You can always find the current currency exchange rate on Google by just typing the two currencies in this format. For example, USD to INR will let you know the current exchange rate for 1 US dollar into Indian Rupee.
Find the “Raise to Power” for any number, for example 3 ^ 5
Type 3^5 or 3**5 to get the result for 3 raise to power 5. Here is the SERP on Google for this query,

These simple calculations can be done from Google Search box by typing these queries and this way you can use Google as a Calculator for your daily usage. Find more calculations related queries on “Google Calculator” feature page.
Mathematical Calculations on Google
Type 24 + 54 + 68 – 34 * 9 / 8Now Google will format this query by arranging the multiplication and division operators in small brackets for correct calculation. Here is the SERP of Google for this query:
Similarly you can type 88% of 2000
It will find the correct amount corresponding to the 88 percentage of 2,000. Here is the SERP for this query,

Convert Units and Currency: type 1000 USD in INR

You can always find the current currency exchange rate on Google by just typing the two currencies in this format. For example, USD to INR will let you know the current exchange rate for 1 US dollar into Indian Rupee.
Find the “Raise to Power” for any number, for example 3 ^ 5
Type 3^5 or 3**5 to get the result for 3 raise to power 5. Here is the SERP on Google for this query,

These simple calculations can be done from Google Search box by typing these queries and this way you can use Google as a Calculator for your daily usage. Find more calculations related queries on “Google Calculator” feature page.
Free Handwriting Fonts to Download from Google Web Directory
We need handwriting fonts to give a personal touch. Here are handwriting fonts which are available to download for free and use on your computer . These handwriting fonts are available on Google Fonts Directory from where you can download them.

Now you can see the list of handwriting fonts available on Google Web Fonts. Choose "Add to Collection" to the number of fonts you want to download and then finally click on the "download button". From there you can download and save these fonts on your personal computer and install them in your "c:\windows\fonts" directory.
How to download free handwriting fonts
Once you are on Google Web Directory, select “Handwriting” from the dropdown named “Filter”. In left tab, be sure that “Latin” is selected .
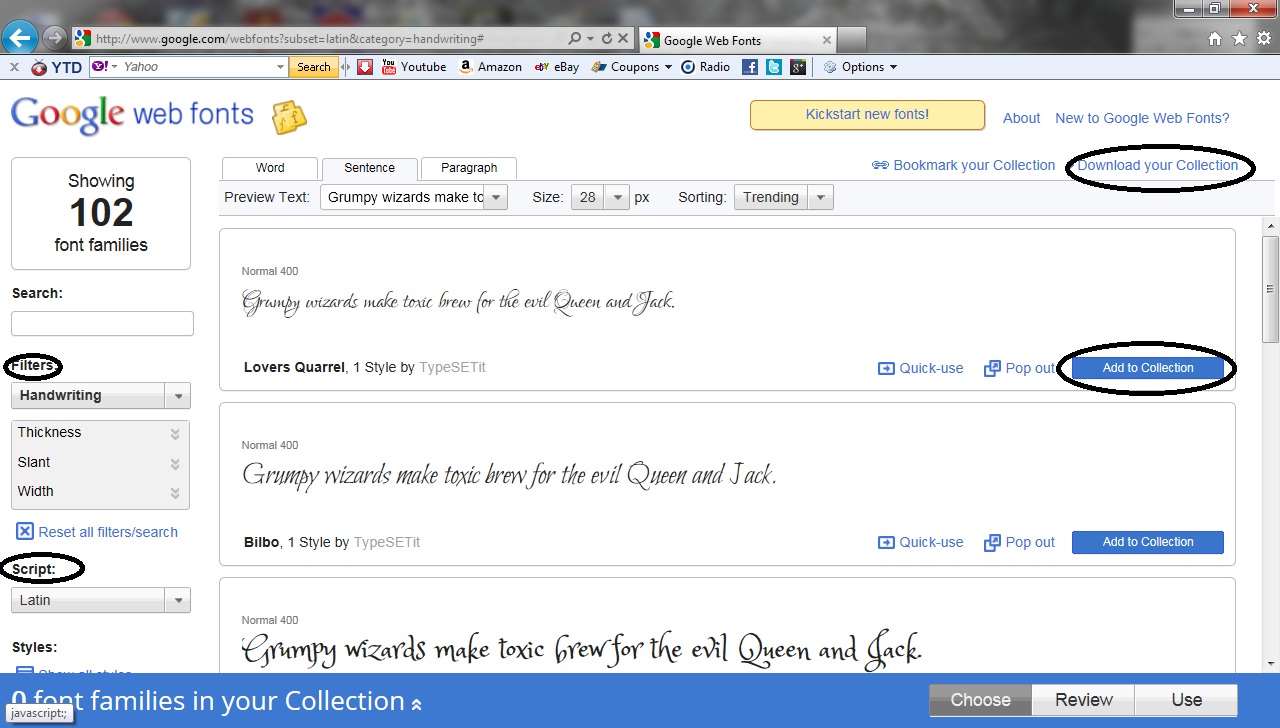
Now you can see the list of handwriting fonts available on Google Web Fonts. Choose "Add to Collection" to the number of fonts you want to download and then finally click on the "download button". From there you can download and save these fonts on your personal computer and install them in your "c:\windows\fonts" directory.
How much RAM Memory is enough for a Fast Computer?
Is 2GB RAM enough for my computer? Do I need to upgrade my computer’s RAM to make it fast or the current configuration is enough? If you are having this kind of queries, then I would try to resolve your problem through this post.

How to find the installed Memory (RAM) on Windows PC?
If you are planning to upgrade the existing RAM, then first you should know your computer’s current configuration. On a Windows PC, you can right click on “My Computer” icon on Start Menu or desktop and click on “Properties” to check the installed memory. You can also enter in BIOS to get the type (DDR1 or DDR2 or DDR3) of installed memory and amount. Once you know the existing RAM type and installation, you need to find the motherboard capability for up-gradation. Browse the motherboard manual to find RAM upgrade limit of the board.
Here is my estimation about RAM required for different type of users i.e. how much RAM is sufficient for different users category.
Normal Users
It includes users who are going to browse few web pages on Internet, open few documents on MS Office, Send emails or do chat with friends. It also covers those who keeps their systems running for few weeks but on very normal load.
I think 2GB DDR2 RAM is sufficient. If you are going for DDR3, then 1GB DDR3 is sufficient for you.
Power Users
Those who open 30+ tabs on browser at a time, runs heavy applications like Adobe products as Flash, Dreamweaver, Photoshop etc. At the same time, they keep running social media tools like Tweetdeck, Facebook desktop tools etc. Clouding documentations tools as well as desktop tools like MS office are very frequent in use. Not much heavier but lighter PC games are running.
I would suggest to go for 4GB DDR2 RAM for your computer. In case of DDR3, 2GB/3GB is more than sufficient.
Virtual Machines and Gamers (Advance Users)
Along with Power user’s applications, if you are also keen to run heavy games like Need for Speed or other heavy games, then you need to have more RAM for smooth gaming experience. Apart from RAM, graphics card also plays very important role in gaming. Other than games, but if you want to have multiple operating systems i.e. Virtual Operating Systems running on same computer inside one operating system then also you need to have more RAM.
I think in that case you should go for 6GB DDR2 RAM installed on computer. As DDR3 is much faster than DDR2, I would suggest to have 4GB DDR3 for this kind of operations.
This stat or detail will require some changes after 3 – 4 years . One should upgrade the existing computer configuration in that much time frame. We should invest in powerful motherboard while purchasing a new computer where you get option to extend the RAM to at least 2 times the currently installed RAM. This one step will increase the life of your computer by at least 2 – 3 years.
Wednesday, May 16, 2012
Online Services To Send Free Fax
If you don’t have fax machine handy, and you have to send an urgent fax, no worries at all! There are a few online services that offer sending fax free. Some services offer free fax service all over the world, and others offer to specific location. Below are some of the free online services listed that you can definitely give a try to send your fax.
 Sends free fax to anywhere in United States and Canada.
 freeFax lets you send fax to virtually anywhere in the world at zero cost to you. You can either send a fax directly without becoming a member, or you can become a member (free) and get some more benefits while sending the fax like speed dial, virtual fax that lets you receive your fax thru your email, your own custom fax sheet, group faxing and more. In case you do not become a member, you get a input box to enter your fax message. In both the cases, the delivery is confirmed to the email address you have entered as your email.
 You can send fax anywhere in the world free of cost. You would need to enter your fax message in the input box provided, you cannot upload the fax document from your computer. In all the cases, they just ask you to enter a proper formatted fax number and your correct email id.
 Thru this service you can send free Online Fax to 50 Countries including the USA, Canada, India, France, Greece, Australia and many more in the World. You can send fax message as well as document uploaded thru your computer. Limit is 2 faxes per day.
 This is a good service for phone users (iphone, blackberry, android and more). It’s a digital scanner and fax in your pocket! You can scan, print and fax wherever you go.
ScanR is a good service that turns your camera phone into a scanner, copy machine, and fax machine. You have to take a picture of a document you want to share with someone else, send it to a ScanR email address, and they send this document on by fax as a .pdf file. You’ll have to download the ScanR software to get the more detailed services, and the basic services are free, they charge you for more advanced services.
 MyFax Free lets you send a fax for free to over 40 countries including United States, Canada, India, Jpan, Chine, Australia and many more. You can upload a file from your computer. The file must not exceed 10MB in size and contain a maximum of 10 pages.Supported files types include Microsoft Word, Excel, PowerPoint, PDF, TIF, GIF, JPEG, etc.
1. Faxzero
Sends free fax to anywhere in United States and Canada. - Ad on the cover page
- Fax 1 document—maximum 3 pages
- Maximum 2 free faxes per day
2. freeFax
freeFax lets you send fax to virtually anywhere in the world at zero cost to you. You can either send a fax directly without becoming a member, or you can become a member (free) and get some more benefits while sending the fax like speed dial, virtual fax that lets you receive your fax thru your email, your own custom fax sheet, group faxing and more. In case you do not become a member, you get a input box to enter your fax message. In both the cases, the delivery is confirmed to the email address you have entered as your email.3. Gujrat4u
You can send fax anywhere in the world free of cost. You would need to enter your fax message in the input box provided, you cannot upload the fax document from your computer. In all the cases, they just ask you to enter a proper formatted fax number and your correct email id.4. Free Fax Button
5. scanR
This is a good service for phone users (iphone, blackberry, android and more). It’s a digital scanner and fax in your pocket! You can scan, print and fax wherever you go.ScanR is a good service that turns your camera phone into a scanner, copy machine, and fax machine. You have to take a picture of a document you want to share with someone else, send it to a ScanR email address, and they send this document on by fax as a .pdf file. You’ll have to download the ScanR software to get the more detailed services, and the basic services are free, they charge you for more advanced services.
6. MyFax
MyFax Free lets you send a fax for free to over 40 countries including United States, Canada, India, Jpan, Chine, Australia and many more. You can upload a file from your computer. The file must not exceed 10MB in size and contain a maximum of 10 pages.Supported files types include Microsoft Word, Excel, PowerPoint, PDF, TIF, GIF, JPEG, etc.
Subscribe to:
Comments (Atom)